Web Apps in 2023: How to Create a Web App in 15 Steps

Niamh Conneely | Marketing Executive
Knowing how to create a web app has become more crucial than ever as web app development stands at the forefront of technological innovation. Web apps are a vital tool for businesses, enabling them to empower their employees, seamlessly engage with customers, and broaden their reach to a wide audience. If you’re considering digitizing your business, investing in web app development is a smart choice.
This blog will provide you with a step by step guide on how to create a web app from scratch. From the initial idea to launching your app, we’ve got you covered. Let’s explore how you can turn your ideas into reality.
What is a Web App?
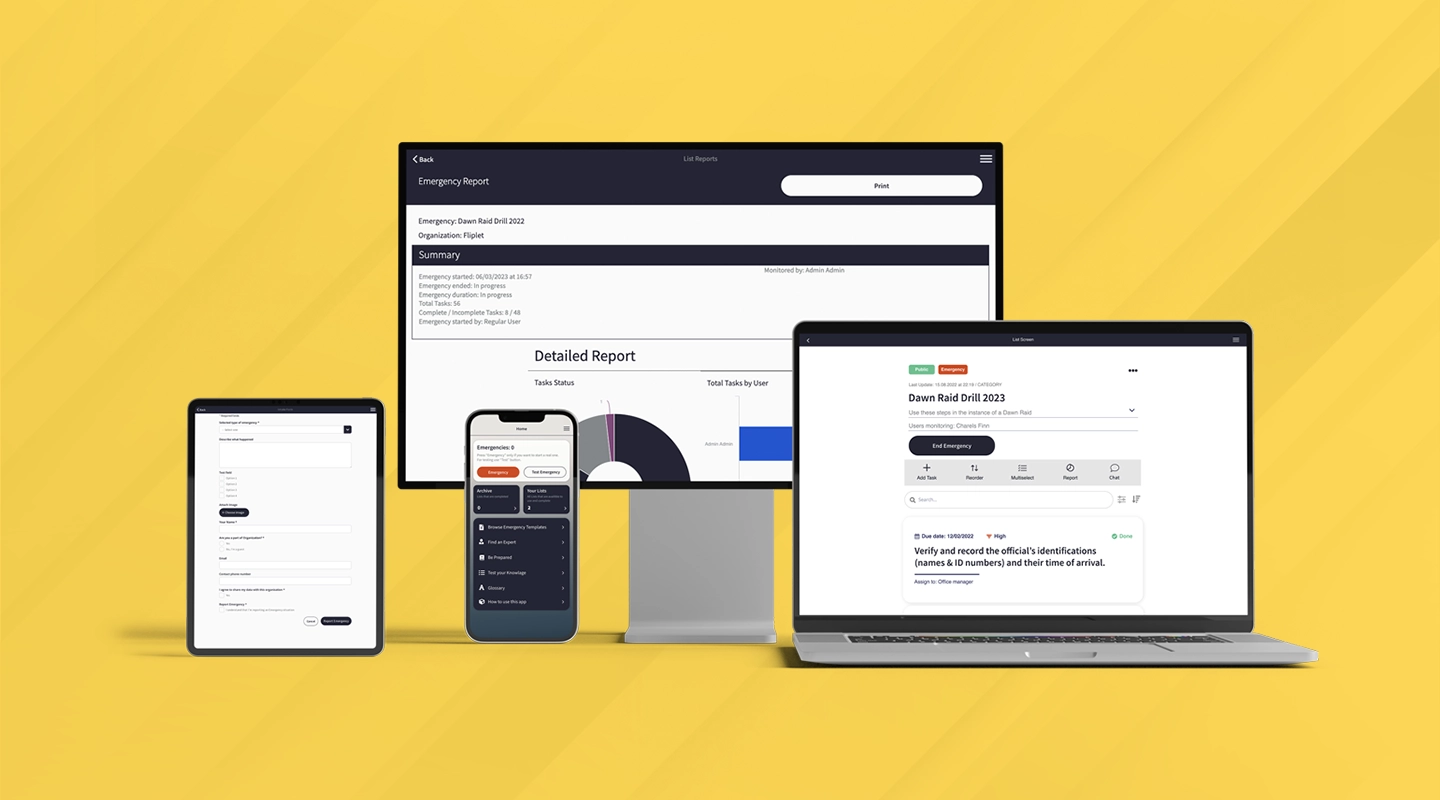
In simple terms, knowing how to create a web app is understanding the process of developing an interactive computer program that operates through web browsers, utilizing technologies like HTML, CSS, and JavaScript. Unlike traditional software, web apps are stored on remote servers, accessible through web browsers without taking up space on your device. This versatility allows users to access web apps from various devices and operating systems.
Web apps serve a multitude of purposes, such as managing data, performing tasks over the internet, and collaborating with teams or individual users. They are not reliant on specific operating systems or programming languages installed on users’ devices, making them highly accessible and versatile.
Examples of web apps include online forms, word processors, email programs like Gmail, and even file scanning tools. The key to web app design is providing a seamless user experience, and these apps often leverage an application program interface (API) to streamline data handling and automation.
In the current digital landscape of 2023, web apps play a pivotal role in facilitating business operations, customer interactions, and reaching a broader audience. Understanding what web apps are and their relevance is essential for any company looking to thrive in today’s digital age.
Types of Web Apps
Understanding the different types of web apps is crucial for anyone wondering how to create a web app that suits their specific needs. These web apps cater to diverse requirements and functionalities, each with its unique characteristics and purposes.
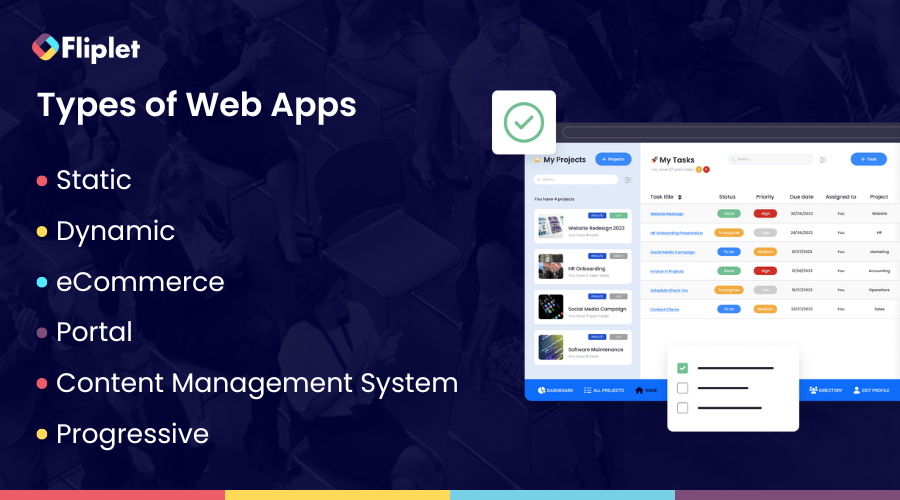
- Static Web Apps: These are like digital posters. They show the same content to everyone and don’t change. Think of them as online brochures or marketing pages.
- Dynamic Web Apps: These are more like blogs. They can change and show different things when you refresh the page. Think of news websites that update with new stories.
- eCommerce Apps: These are for online shopping. Big stores like Amazon use them. They handle products, orders, and payments.
- Portal Web Apps: These let you log in to access services or links. Google is a great example. You log in to use Gmail, search, and other services.
- Content Management System (CMS) Web Apps: They help you create content without being a tech expert. WordPress for blogs and Canva for designs are examples.
- Progressive Web Apps (PWAs): These act like mobile apps but work in web browsers. They combine mobile and web app development for a seamless experience.
Advantages and Disadvantages of Web Apps
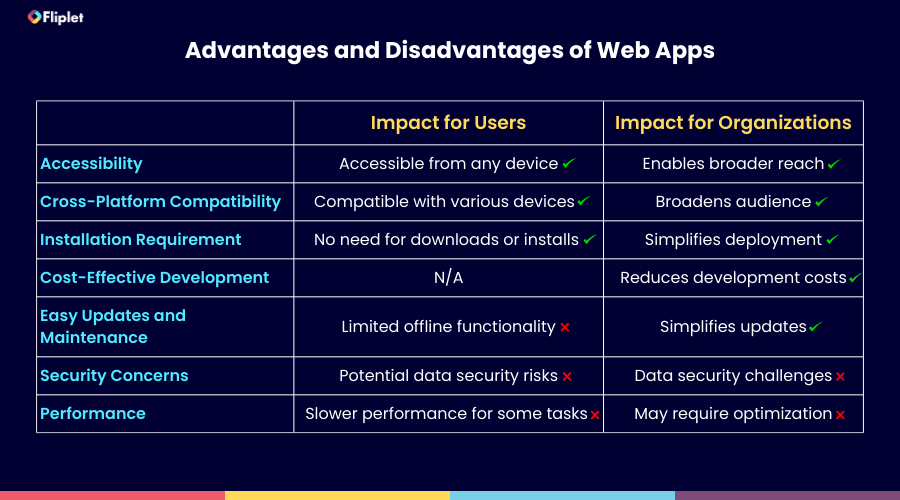
Before we discuss how to create a web app it’s important to understand the advantages and disadvantages of web apps, the impact on the users as well as organizations.
The impact on users
Web apps offer users great accessibility and convenience. Users can interact with these applications from a wide array of devices and locations, making cross-platform compatibility a significant advantage. What sets web apps apart is their user-friendly nature, as they require no installations, eliminating the need for time-consuming downloads.
However, users must ensure a stable internet connection since web apps rely on it for uninterrupted operation. Additionally, while web apps facilitate easy updates and maintenance, some may have limited offline capabilities, requiring an active internet connection for full functionality. Security is another consideration, given the online nature of web apps, underlining the importance of robust data protection measures.
Impact on organizations
If your organization is considering how to create a web app, understanding the ramifications of web apps for organizations is essential. Web apps enable organizations to extend their reach and customer base while aligning with cost-effective development practices. Their advantage lies in the elimination of installation requirements, streamlining deployment processes and enabling organizations to introduce their offerings swiftly. The straightforward approach to updates and maintenance enhances operational efficiency.
However, organizations should remain vigilant concerning potential performance challenges that can arise with web apps. Organizations need to be vigilant regarding the data they store, make sure the solution you use has security measures in place such as being ISO 27001 certified. Check out Fliplet’s security features for more information.
Required Technologies and Programming Languages
You don’t have to be a developer to create a web app, you can use a no-code platform like Fliplet to help you get started. Let’s delve into the key technologies and programming languages that play a vital role in web app development. Whether you’re a seasoned developer or a non-technical individual, understanding these components will help you make informed decisions throughout your web app development journey.
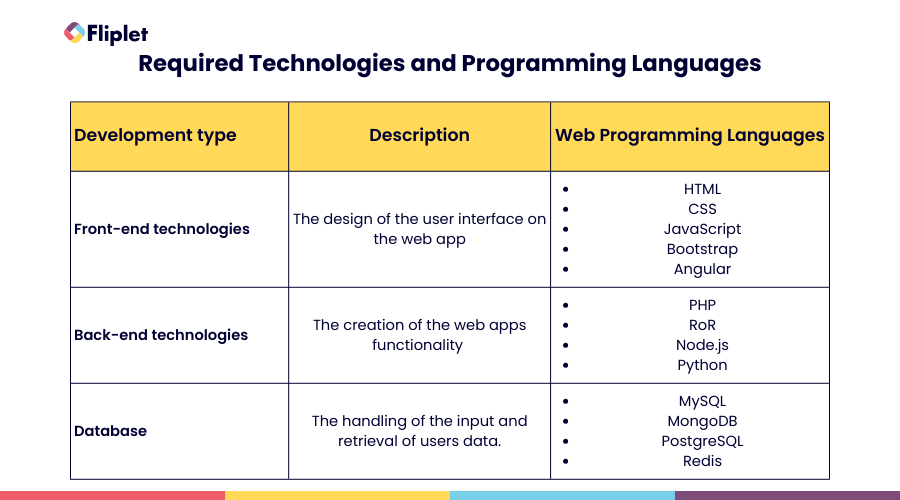
Here’s a brief overview of the key technologies and programming languages used in web app development:
- HTML (Hypertext Markup Language): HTML is the backbone of web development. It’s used to structure the content and layout of web pages. Think of it as the framework for your web app’s user interface.
- CSS (Cascading Style Sheets): CSS is used for styling and presentation. It defines how HTML elements should be displayed, including layout, colors, and fonts. It makes your web app visually appealing.
- JavaScript: JavaScript is a scripting language that adds interactivity to web pages. It allows you to create dynamic elements, handle user input, and perform actions based on events. It’s essential for creating responsive web apps.
- Bootstrap: Bootstrap is a popular front-end framework that simplifies web design. It provides pre-designed UI components and responsive layout grids, making it easier to create mobile-friendly web apps.
- Angular: Angular is a JavaScript framework maintained by Google. It’s used for building single-page applications (SPAs) with dynamic content. Angular simplifies tasks like data binding, dependency injection, and routing.
- PHP (Hypertext Preprocessor): PHP is a server-side scripting language commonly used for web development. It’s used to build dynamic web apps, process forms, and interact with databases. PHP is often paired with MySQL.
- Ruby on Rails (RoR): RoR is a web application framework written in Ruby. It follows the convention over configuration (CoC) and doesn’t repeat itself (DRY) principles, making it efficient for building web apps.
- Node.js: Node.js is a server-side JavaScript runtime environment. It’s ideal for building scalable and high-performance web apps. Node.js is commonly used with the Express.js framework.
- Python: Python is a versatile programming language used for various applications, including web development. Frameworks like Django and Flask make it easy to build web apps with Python.
- MySQL: MySQL is an open-source relational database management system (RDBMS). It’s used for storing structured data in web apps. MySQL is known for its speed and reliability.
- MongoDB: MongoDB is a NoSQL database that stores data in a flexible, JSON-like format. It’s suitable for handling unstructured or semi-structured data in web apps, making it easy to scale and adapt.
- PostgreSQL: PostgreSQL is another open-source RDBMS known for its robustness and extensibility. It’s suitable for complex web apps that require advanced data management features.
- Redis: Redis is an in-memory data store often used as a caching layer in web apps. It provides fast data retrieval and can enhance the performance of data-intensive applications.
These technologies and programming languages form the foundation of web app development, and their combination depends on the specific requirements of your project.
Importance of Minimum Viable Product (MVP)
MVP is a fundamental concept in web app development that offers valuable benefits to businesses. Imagine it as the essential version of your web app, created with core features to test its viability and gather early user feedback. Additionally, understanding how to create a web app mock-up during this stage can be incredibly helpful in visualizing the MVP’s design and functionality.
You can go very quickly from the prototype to the MVP and then to the live product.” Ginevra Saylor, Director, Innovation and Knowledge Programs at Gowling WLG
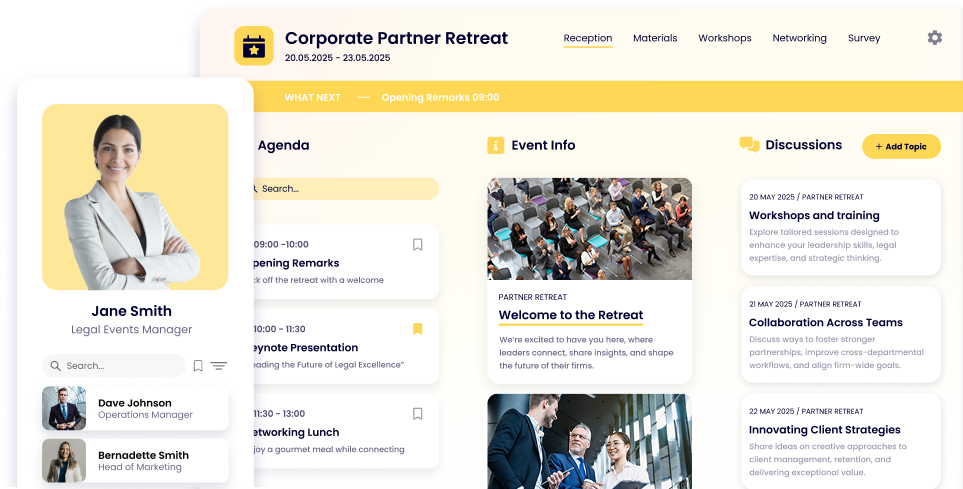
Watch the full case study to see what apps Gowling WLG have created with Fliplet.
The importance of starting with an MVP lies in its ability to:
- Save Resources: Developing a full-featured web app from the start can be costly and time-consuming. MVP allows you to build and launch quickly with minimal investment.
- Gather User Feedback: By releasing a basic version, you engage users early. Their feedback helps you understand their needs and preferences, guiding further development.
- Test Market Demand: An MVP lets you gauge whether your web app idea resonates with your target audience. It minimizes the risk of building a product that may not find a market.
- Iterate and Improve: With user insights from the MVP, you can make informed decisions about enhancing and expanding your web app. This iterative process leads to a more refined final product.
Let’s illustrate the concept with an example:
Imagine you want to create a web app for managing tasks and projects. A full-featured app might include advanced features like team collaboration, notifications, and file sharing. However, to test the waters and validate your idea, you decide to start with an MVP.
Your MVP could be a simple task list app where users can create, edit, and delete tasks. It lacks the key features of the final product but serves the core purpose. By launching this MVP, you quickly learn if users find value in your basic task management concept.
As you gather user feedback, you might discover that they also want a due date feature. With this insight, you can prioritize adding due dates in the next iteration of your web app.
Over time, your app evolves based on real user needs, increasing its chances of success in the competitive web app landscape.
The benefits of MVP on organizations are:
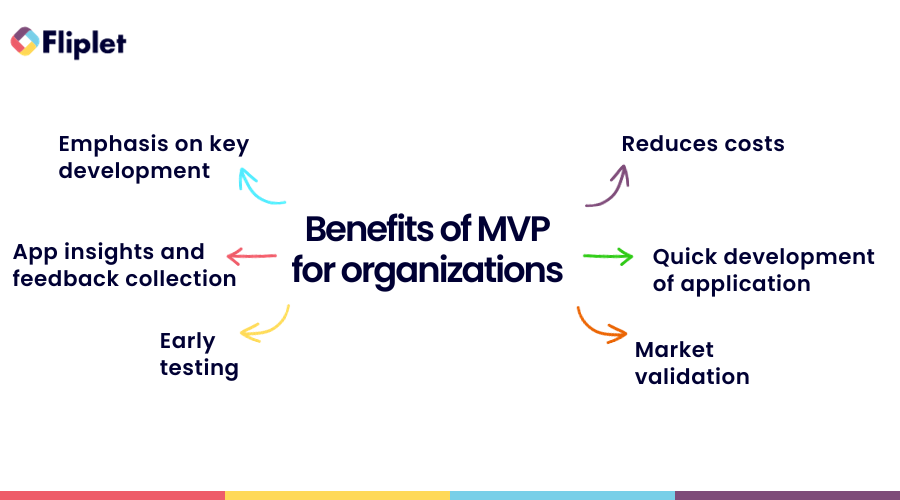
So, starting with an MVP is a strategic approach that helps you build a web app efficiently, validate your idea, and create a product that truly meets user expectations. It’s a practical method to minimize risks and maximize your chances of success in the dynamic world of web app development.
How to make a web app in 15 simple steps
Creating a web app is an exciting journey that begins with ideation and culminates in launching a functional application to the world. This step-by-step guide will walk you through the process of how to create a web app, from generating your initial idea to the post-launch stage. Whether you’re building a timesheet web app or something entirely unique, these fundamental steps apply.
Ideation Stage

The ideation stage marks the beginning of your web app development journey. This is where you transform your creative ideas into a tangible plan for your application. Let’s explore the key aspects of this stage:
Step 1: Idea Generation
Generating a compelling idea is the initial step in building a web app. Here, you’ll want to brainstorm and conceptualize the core idea behind your app. To help you get started, consider the following:
- What problem does your app aim to solve?
- Is there a need for your app in the market?
- How passionate are you about this idea?
- Can you envision yourself using this app?
- What unique features or benefits will your app offer?
Remember, your idea should resonate with both your target audience and your personal interests, as your passion will be a driving force throughout the development process.
Step 2: Market Research
Market research is crucial for understanding the landscape in which your app will operate. Here are some essential questions to ask during this phase:
- Is there a similar product or service in the market?
- Who are your potential competitors, and what are their strengths and weaknesses?
- What is the demand for your app within your target market?
- Are there trends or emerging technologies that could impact your app’s success?
- How can you differentiate your app from existing solutions?
Step 3: Define the App’s Functionality
Defining your app’s functionality is about outlining the core features and capabilities it will offer to users. To clarify your app’s purpose, consider these key points:
- List the primary functions your app will perform.
- Prioritize these functions based on their importance and relevance to your target audience.
- Keep the initial feature set simple and focused on addressing specific user needs.
- Avoid the temptation to overcomplicate the app with unnecessary features.
- Ensure that your app’s functionality directly aligns with solving the identified problem or need in the market.
With a well-defined idea and a clear understanding of your target market, you’ll be well-prepared to move on to the next stages of web app development.
Design Stage

The design stage is where your web app takes shape visually and functionally. During this phase, you’ll create a roadmap for your app’s user interface and seek validation from potential users.
When you design and develop your app consider creating an MVP first. The web app mock-up during this stage can be incredibly helpful in visualizing the MVP’s design and functionality.
Step 4: Create Workflow Plan
In the process of developing your web app, crafting an effective workflow plan is a pivotal step. This plan serves as the blueprint for how your app will function and how users will interact with it. Here’s how you can create a workflow plan that ensures your web app meets its intended purpose.
- Understanding User Journey: Begin by gaining a clear understanding of the user journey within your web app. Visualize how users will navigate through your application, from their initial entry point to achieving their desired outcomes. Consider the logical sequence of screens, interactions, and the flow of information.
- Defining User Interactions: Outline the various interactions users will have with your app. This includes actions they can take, such as signing up, logging in, browsing content, making purchases, or any other relevant activities. Clearly define the steps and processes involved in each interaction.
- Mapping Screen Transitions: Visualize how users will move from one screen to another within your web app. Identify the triggers or actions that lead to screen transitions, such as clicking buttons, selecting options, or completing forms. Ensure a smooth and intuitive navigation experience.
- Flow of Information: Determine how data and information will flow within your app. Consider how user inputs will be processed, stored, and retrieved. Define the databases, APIs, or data sources that your app will interact with. Ensure data integrity and security throughout the flow.
- User Feedback and Collaboration: Collaboration is key to creating an effective workflow plan. Engage with your team members, stakeholders, and even potential users to gather input and insights. Seek feedback on the proposed user journey and interactions. Collaboration tools can facilitate this process.
When creating your workflow plan, start with a clear understanding of the user journey. Visualize how users will interact with your app, from their initial point of entry to their desired actions and outcomes. Consider the logical sequence of screens and the flow of information. Collaboration tools in these software options allow you to gather feedback from team members or potential users, ensuring that your workflow plan aligns with the app’s intended functionality.
Step 5: Wireframe the UI
Wireframing involves creating a basic, visual representation of your app’s user interface. This step helps you solidify the layout and design before moving on to development.
When wireframing, consider the following:
- Moving Between Screens: Ensure a logical flow for users as they navigate from one screen to another.
- Elements of Branding: Maintain a consistent branding theme throughout your app’s interface.
- Forms and Input Fields: Design clear and user-friendly forms that guide users through data entry.
- Interactive Elements: Plan how interactive elements, like buttons or sliders, will enhance the user experience.
- Annotations: Include notes or comments to clarify the functionality of specific UI elements for developers.
Step 6: Seek Early Validation
Before investing heavily in development, it’s crucial to validate your app’s concept with potential users. Share your wireframes or prototypes with a small group of representatives from your target audience. This step helps you gather valuable feedback and ensures that your app aligns with user expectations. Engaging with your audience early on can save time and resources in the long run by addressing potential issues and improving user satisfaction.
Additionally, consider conducting user surveys or interviews to gain deeper insights into their needs and preferences.
By embracing user feedback and refining your design accordingly, you’ll increase the chances of creating a web app that resonates with your target audience. This iterative approach sets a strong foundation for the development phase.
Development Stage

In the development stage of creating a web app, you’ll be diving deep into the technical aspects of your project. Here’s what you need to focus on:
Step 7: Design the Database Architecture
Choosing the right database architecture is crucial to the success of your web app. You have a few options to consider:
- SQL Database: SQL databases are ideal when your data is highly relational. If your app involves multiple well-defined record types with relationships between them (e.g., customers and invoices), SQL databases are a strong choice. Common SQL database options include MySQL, PostgreSQL, and Microsoft SQL Server.
- Document Database: Document databases are suitable when your data is less relational. These databases store records as unstructured documents, often in JSON format. While document databases offer flexibility, you’ll need to manage relationships manually. Examples include MongoDB, CouchDB, and Firebase.
Decide how you want to segregate your clients’ data to prevent any potential data leakage. You can choose between physical separation (each client has a separate database) or logical separation (all clients share one database). Each approach has its pros and cons, so carefully evaluate which one aligns with your app’s requirements.
Step 8: Frontend Development
Frontend development involves creating the visible and interactive elements of your web app. You’ll primarily work with HTML, CSS, and JavaScript. Depending on your chosen frontend framework, follow these steps:
- Set Up Your Development Environment: Choose a code editor like VS Code or Sublime Text and select a compilation and packaging framework such as Webpack, Gulp, or Grunt. These tools help with code bundling, serving, and hot reloading during development.
- Select a Frontend Framework: While not mandatory, using a frontend framework like React, Ember, Vue, or Svelte can significantly streamline your development process.
- Configuration: Configure your packaging tool to communicate with your backend, which may run on a different port during development. Consider using Node’s HTTP proxy to handle API requests to your backend.
- Security: As you develop your frontend, ensure that API requests include necessary security measures, such as authentication tokens or sessions.
Frontend development is critical for creating an engaging and user-friendly interface. Your choice of frontend technology impacts your app’s usability and performance.
Step 9: Backend Development
Backend development manages the server-side aspects of your web app. Focus on these key tasks:
- Choose Between Server Pages and Single Page Application (SPA): Your choice between server pages and SPAs will influence how you develop your backend. Server pages generate and serve the frontend along with handling backend operations, while SPAs rely on static frontend files served separately.
- HTTP Endpoints: Create HTTP endpoints that allow your frontend to interact with your data, including actions like creating, reading, updating, and deleting records (CRUD operations).
- User Authentication: Implement user authentication mechanisms, such as username and password or third-party options like OpenID (Google or Facebook sign-in).
- Authorization: Define user roles and permissions to determine who can perform specific actions within the app.
- Environment Management: Set up multiple environments for testing, beta releases, and production. This segregation helps ensure smooth development and deployment processes.
Backend development ensures that your app’s data management, security, and user access are robust and efficient. Choose a framework that aligns with your project’s requirements and your familiarity with the technology.
Building a web app’s backend can be challenging, but it’s a crucial component that supports your app’s functionality and user experience.
Testing Stage

In the journey of learning how to create a web app, the testing stage plays a pivotal role in ensuring that your application is robust, secure, and user-friendly. Just like any other application, a web app must undergo thorough testing to deliver a seamless experience to users. Here are the key aspects to consider during the testing stage:
Step 10: Functionality
- Connectivity: Ensure that all parts of your web app can connect seamlessly, including communication between the frontend and backend components.
- Database Connections: Test the integration between your app and the database to verify that data is retrieved and stored correctly.
- Links Between Web Pages: Verify that all links within your web app lead to the intended destinations without errors or broken links.
- User Information Collection: Check that the app accurately collects and stores user information, following the defined data schema.
Usability:
- User Experience Testing: Evaluate the overall user experience to identify any usability issues. This often involves soliciting feedback from both internal team members and external users to gather diverse perspectives.
Interface:
- App-Server to Web-Server Interaction: Thoroughly test the interaction between your app server and web server to ensure smooth communication. Every component that interacts with users should undergo rigorous testing.
Compatibility:
- Browser and Device Compatibility: Test your web app across various browsers and devices to ensure it functions correctly and looks consistent on different platforms.
Performance:
- Load Testing: Assess your app’s performance under heavy user loads to identify potential bottlenecks or slowdowns. Additionally, test the app’s responsiveness under varying internet speeds to cater to users with different connectivity capabilities.
Security:
- Vulnerability Testing: Conduct security testing to identify weak points and vulnerabilities in your web app. This is a critical step to protect user data and maintain the integrity of your application.
Troubleshooting:
Throughout the testing stage, be prepared to troubleshoot and address any issues or bugs that arise. Effective troubleshooting ensures that your web app is free from critical errors before it goes live.
Once you’ve successfully completed the testing phase and resolved any identified issues, you’re ready for the final steps in creating a web app: hosting and deployment. Hosting involves selecting a suitable hosting solution for your app, while deployment brings your web app to life, making it accessible to users worldwide.
These last steps are the culmination of your efforts, and they mark the beginning of your web app’s journey in the real world.
Launch Stage

You’re in the final stretch of your web app development journey. The launch stage involves crucial decisions and actions to ensure a successful introduction of your app to the world.
Step 11: Choose a Hosting Solution
Selecting the right hosting solution is pivotal to the performance, reliability, and scalability of your web app. Here’s what you need to consider:
- Scalability
- Uptime and Reliability
- Security
- Support and Maintenance
- Cost
Selecting the right hosting solution is pivotal to the performance, reliability, and scalability of your web app. While there are various hosting options available, one standout choice for hosting web apps is Fliplet.
Fliplet offers a comprehensive web app solution with several advantages:
- Free Web App Creation: Fliplet provides a fantastic opportunity to create web apps for free. This is ideal for anyone or any organization looking to minimize initial costs.
- No-Code Development: One of Fliplet’s standout features is its no-code development platform. This means that virtually anyone, regardless of their coding expertise, can create and customize web apps with ease. It democratizes app development, allowing teams and individuals to bring their ideas to life.
- Security and Compliance: Security is a top priority, and Fliplet ensures that your web apps are hosted in a secure and compliant environment. This peace of mind is crucial, especially when handling sensitive user data or confidential information.
- Pre-Built Solutions: Fliplet comes equipped with pre-built solutions for various use cases, including events management, community building, and e-learning. These pre-built templates can significantly accelerate your development process, allowing you to focus on customizing your app’s functionality.
- Integration Capabilities: Seamlessly integrate your Fliplet-hosted web app with existing platforms and systems. Whether you need to connect to databases, third-party APIs, or internal tools, Fliplet provides the flexibility to make your web app an integral part of your technology stack.
- Scalability: As your web app grows and attracts more users, Fliplet’s hosting solution can scale with your needs. You won’t have to worry about outgrowing your hosting environment, ensuring a smooth user experience regardless of traffic volume.
- Dedicated Support: Fliplet offers excellent customer support to assist you throughout your web app journey. Whether you encounter technical challenges or have questions about using the platform, their team is readily available to provide guidance and solutions.
- Effortless Maintenance: Fliplet simplifies the process of maintaining your web app. With a user-friendly interface and intuitive tools, you can make updates, add new features, and fix issues without the need for extensive coding or development skills.
- Scalability Made Simple: As your web app gains popularity and user numbers grow, Fliplet’s scalability ensures a smooth transition. You can effortlessly scale your app to accommodate increased demand without worrying about complex infrastructure changes.
By choosing Fliplet as your hosting solution, you can take advantage of these features to streamline the launch of your web app, reduce development costs, and ensure a secure and compliant hosting environment. Whether you’re building an event management platform, a vibrant online community, or an e-learning portal, Fliplet has the tools and infrastructure to support your web app’s success.
Step 12: Deployment
Deployment is the process of making your web app accessible to users.Deploying your web app doesn’t have to be daunting. In fact, with the right approach, it can be a seamless process. Here are some simplified steps to ensure a smooth deployment:
- Testing Environment: Before going live, thoroughly test your web app in a staging or testing environment. This helps identify and fix any last-minute issues.
- Backup Data: Don’t take chances with your data. Create backups of your app’s data and code to prevent any unexpected data loss during deployment.
- Monitoring Tools: Keep an eye on your app’s performance with monitoring tools. These tools provide real-time insights and help you detect and address issues quickly.
- Documentation: Create straightforward documentation for your team to follow during deployment. Include step-by-step instructions and contact information for key team members.
Remember, deploying your web app can be a smooth and straightforward process, especially when utilizing no-code solutions like Fliplet. So, don’t let deployment worries hold you back from sharing your app with the world.
Post-Launch Stage

Congratulations, you’ve successfully launched your web app! However, the journey doesn’t end here. To ensure long-term success, continuous improvement is essential in the world of web app development. Here’s what you need to focus on after your app goes live:
Step 13: Seek User Feedback
- User Surveys: Conduct regular user surveys through email or in-app prompts. Gather feedback on their experiences, pain points, and suggestions for improvement.
- In-App Feedback Mechanisms: Implement in-app feedback forms or buttons that allow users to report issues or share their thoughts directly within the app. This immediate feedback can be incredibly valuable for addressing issues promptly.
Step 14: Roll Out Updates
- Enhanced Functionality: Updates can introduce new features and functionalities, enhancing the overall user experience.
- Bug Fixes: Addressing any remaining bugs or issues ensures a smoother, error-free experience for users.
- Security: Updates can patch vulnerabilities, keeping your app and user data secure.
- User Engagement: Regular updates demonstrate your commitment to improving the app, which can help retain existing users and attract new ones.
- Competitive Edge: Staying current and competitive in the fast-paced world of web apps is crucial. Regular updates keep your app fresh and aligned with industry standards.
Step 15: Promote Your Web App
Promotion is key to expanding your app’s user base. Here are some strategies to consider:
- Social Media: Leverage platforms like Facebook, Twitter, Instagram, and LinkedIn to create a strong online presence. Share engaging content, user testimonials, and updates about your app.
- Content Marketing: Start a blog or create informative content related to your app’s niche. Share valuable insights, tips, and tutorials that can attract users interested in your app’s functionalities.
- App Store Optimization (ASO): Optimize your app’s listing on app stores like Google Play Store and Apple App Store. Use relevant keywords, high-quality visuals, and compelling descriptions to increase visibility.
- Email Marketing: Build and nurture an email list of users and potential users. Send regular newsletters with updates, tips, and exclusive offers to keep users engaged.
- Paid Advertising: Invest in targeted advertising campaigns on platforms like Google Ads, Facebook Ads, or Instagram Ads. These can help you reach a wider audience interested in your app.
- Partnerships and Collaborations: Partner with influencers or other businesses in your niche to promote your app to their audiences.
- SEO: Ultimate Guide: How to do SEO for mobile apps in 5 steps
Use Fliplet’s App Promo Generator to generate social media posts, emails, internal company messages and app store listing.
Remember that promotion is an ongoing effort. Continuously monitor and adjust your marketing strategies based on their effectiveness, user feedback, and changing market trends. Building a community around your app can also encourage word-of-mouth recommendations, which are incredibly valuable for growth.
By following these six simple steps you will have your web app up and running in no time. If you want to make a custom app without any coding check out this blog for six easy steps to do so.
Start building your web app for free with Fliplet.
How can no-code platforms can save you time and money when developing a web app?
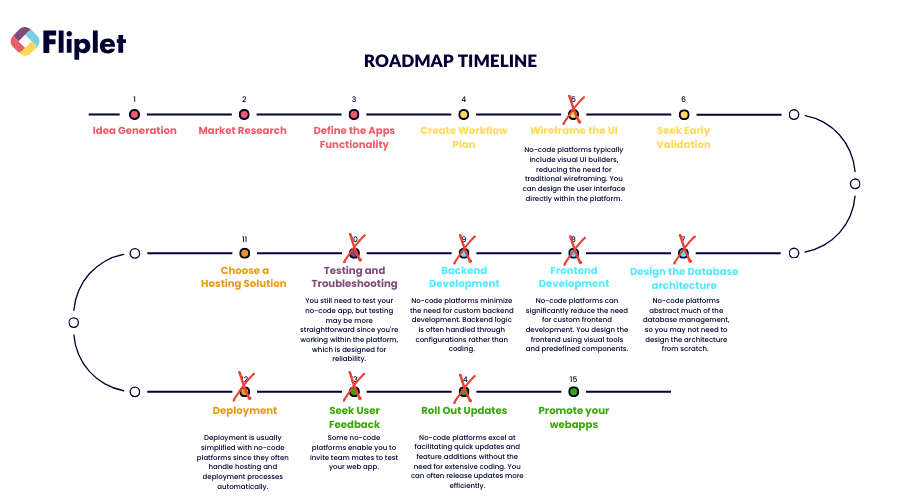
No-code platforms are a game-changer in web app development, significantly accelerating the entire process. By providing intuitive, visual interfaces and pre-built components, these platforms empower users to design, build, and deploy web apps with minimal coding or technical expertise. This speed-up is especially evident in tasks like UI design, database setup, and logic configuration, which traditionally consume considerable time and resources.
No-code platforms provide rapid prototyping, quick iterations based on user feedback, and seamless updates—all of which contribute to a faster and more efficient web app development process, ultimately reducing time-to-market. Check out our blog on Why use a pre-built app builder?
Real world examples
Hear how Gateley use Fliplet to create web apps:
You can find out more in the full case study or read the blog on how Gateley drives engagement to their website.
Here are six examples of successful web apps:
- Trello: Trello is a web-based project management tool that began as an idea to simplify task management. The founders envisioned a visual and collaborative platform for organizing tasks on virtual boards.
- Dropbox: Dropbox is a cloud-based file storage and sharing web app. Its success is attributed to its clean and intuitive design, making it easy for users to store and share files effortlessly.
- Google Docs: Google Docs is a web-based document editing and collaboration tool. Google’s development team worked on creating a seamless online office suite, enabling users to collaborate on documents in real-time.
- Spotify: Spotify, a web-based music streaming service, gradually expanded its services to various countries. Its successful launch strategy involved securing licensing agreements with music labels and tailoring its offerings to local markets.
How to Measure Success
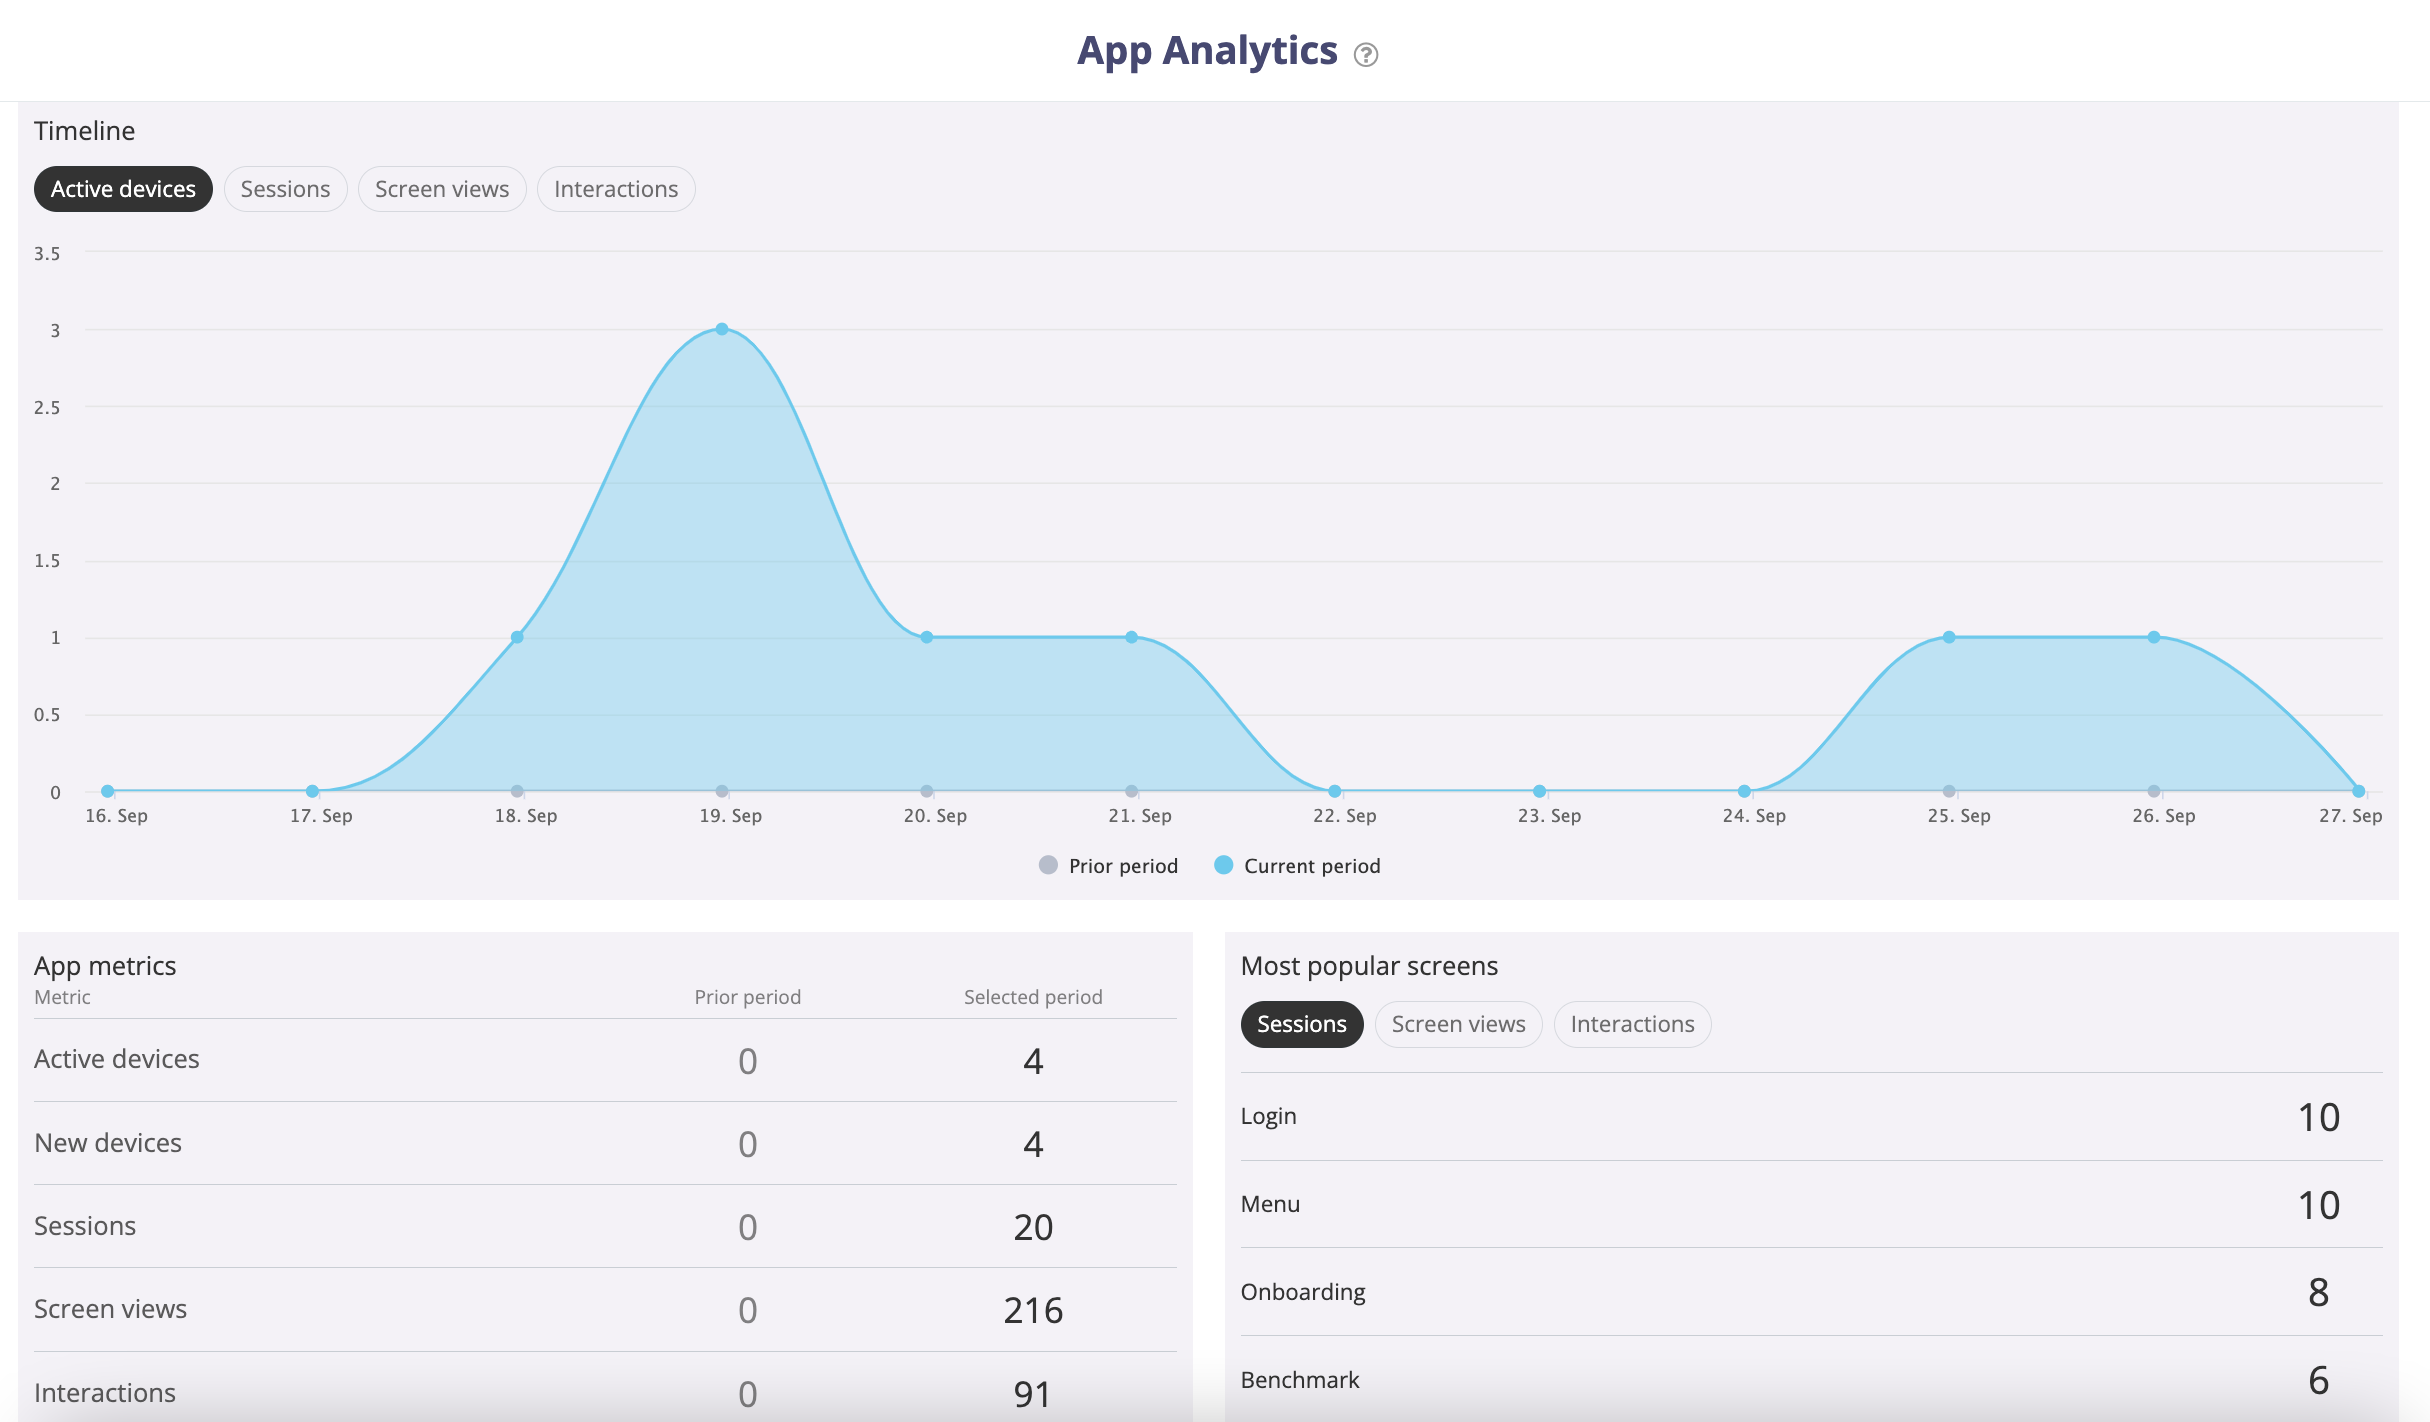
Once your web app is live and running, it’s crucial to measure its success and gather valuable insights to make informed decisions. Key Performance Indicators (KPIs) are essential metrics that help you evaluate various aspects of your web app’s performance.
Key Performance Indicators (KPIs) to Track
Here’s a breakdown of the KPIs you should keep track of:
- Active devices: Total number of devices that has the app installed and opened at least once during the selected time range
- New devices: Total number of new devices that installed the app and opened it at least once during the selected time range
- Sessions: Number of times the app was opened. A session usually lasts for about 30 minutes
- Screen views: Total number of screens that were viewed
- Interactions: number of actions by users in the app. An action means for example clicking on a link or menu item
- Most active users: Lists your most active users. This requires a login on the app to be tracked
- Actions per user: List the total number of actions per user. This requires a login on the app to be tracked
- Most popular screens: List of the most popular screens across user’s sessions. Can be filtered by session, screen views, or Interactions
Fliplet provides you with robust analytics capabilities to gain valuable insights into your app’s usage and performance. These analytics are automatically enabled on all Fliplet apps, ensuring you have access to essential data for review and assessment. With data refreshed every 4 hours, you can easily access these analytics within Fliplet Studio. The analytics cover various aspects of your app’s usage, including active devices, new devices, sessions, screen views, and interactions. You can also track your most active users, actions per user, most popular screens, and interactions per screen.
This wealth of information empowers you to make data-driven decisions, optimize user experiences, and continuously improve your app’s functionality and engagement. Whether you’re interested in user behavior, popular content, or overall app performance, Fliplet’s analytics provide the insights you need to ensure your app’s success.
By regularly assessing these KPIs, you can gain valuable insights into your web app’s performance, identify areas for enhancement, and make informed strategic decisions to drive its success.
Cost of Web App Development
Creating a web app involves not only a comprehensive development process but also financial considerations. Knowing how to create a web app from scratch means understanding the costs associated with each step of the journey.
From ideation to deployment, here’s a brief overview of the financial aspects involved in developing a web app if you are not using a no-code platform:
- Ideation Stage: At this early stage, you’ll need to budget for market research and idea validation. Expenses may include conducting surveys or focus groups to gather insights into user needs and preferences.
- Design Stage: Designing your web app requires tools and potentially hiring a UI/UI designer if you don’t have those skills in-house. Software subscriptions for design and wireframing tools also factor into the cost.
- Development Stage: The core development phase is where a significant portion of your budget will be allocated. Costs may include salaries for developers, software licenses, and server infrastructure.
- Testing Stage: Quality assurance is critical, and testing can involve both manual and automated processes. Budget for testing tools and, if needed, hiring testing professionals.
- Launch Stage: Choosing a solution and deploying your web app come with their own expenses. If you opt for a no-code platform like Fliplet, you can significantly reduce hosting and deployment costs.
- Post-Launch Stage: Seeking user feedback and rolling out updates are ongoing processes that require resources. Marketing and promotion efforts to attract users also contribute to your budget.
- Maintenance: Don’t forget the costs associated with ongoing maintenance, server hosting, and any further updates or feature enhancements.
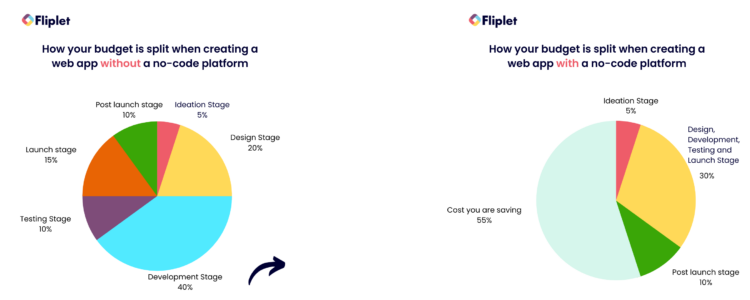
A no-code platform provides an all-inclusive solution that covers the design, development, testing, and launch stages of web app creation, alleviating any concerns about budgeting for each phase separately. You gain access to a comprehensive toolkit, ensuring a cost-efficient and hassle-free journey from concept to launch. With no-code platforms such as Fliplet, web app creation becomes more widely accessible to a larger audience without requiring significant financial resources or technical know-how.
Now you have your web app you can look into creating a mobile app. Find out How to Turn Your Web App to Mobile App
Why you should build a web app with Fliplet
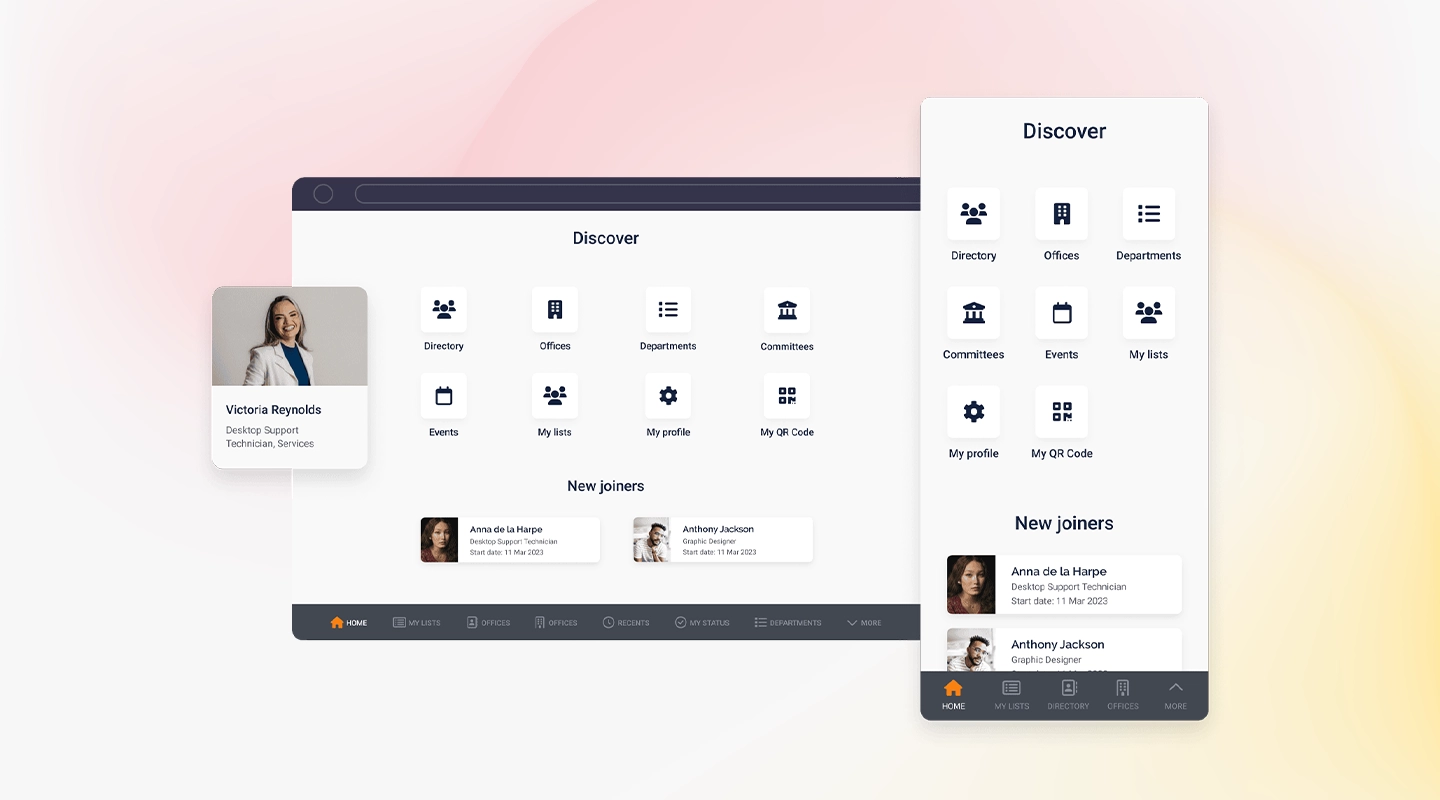
With Fliplet, you can transform your web app idea into a reality without the need for extensive coding knowledge or a substantial budget. Fliplet offers a user-friendly, cost-effective solution, including pre-built templates and analytics, making web app development accessible to all.
Whether you’re building a client facing app, e-commerce platform, community app, internal app, Fliplet’s versatility and affordability make it a valuable tool in your web app creation journey. Start your web app development today and discover the possibilities with Fliplet – it’s free to get started.
Summary
Creating a web app can be an exciting venture, and understanding the step-by-step process is essential for success. We’ve explored the comprehensive journey of how to create a web app, from ideation to post-launch strategies. Here are the key takeaways and essential points to remember:
- Idea Generation: Start by brainstorming and refining your app concept.
- Market Research: Research your target audience, competitors, and market trends.
- Defining Functionality: Clearly define your app’s features and purpose.
- Design: Create a workflow plan, wireframe your UI, and seek early validation for an efficient design stage.
- Development: Choose the right database architecture, focus on frontend and backend development.
- Testing: Rigorously test your app for functionality, usability, interface, compatibility, performance, and security.
- Launch: Select an appropriate hosting solution and deploy your web app.
- Post-Launch: Continuously seek user feedback, roll out updates, and promote your web app for sustained success.
- Measuring Success: Use key performance indicators (KPIs) to track and assess your app’s performance.
- Cost Considerations: Understand the cost of web app development, which varies based on app type and features.
Courses to get you started with Web App Development
- Coursera: Full Stack Web and Multiplatform Mobile App Development. Sign up on Coursera
- EdX: Professional Certificate in Web Development. Sign up on edX
- Udemy: The Web Developer Bootcamp. Sign up on Udemy
FAQs
How do I create a web app using Fliplet?
Creating a web app with Fliplet is relatively straightforward, especially for beginners. Start by visiting the Fliplet website and either signing up for a new account or logging in if you already have one. Once inside, Fliplet offers a range of pre-built templates suitable for various needs. You can select any of these templates and customize them according to your requirements. Once you’ve made the desired changes, you can then publish your web app.
How do I create a progressive web app (PWA)?
A Progressive Web App (PWA) is a type of web application designed to work on any device and offers functionalities like offline access, push notifications, and device hardware access. To create a PWA:
- Design your web app to be responsive, ensuring it looks and functions well on any device.
- Ensure your web app runs over HTTPS for security.
- Create a web app manifest, which is a JSON file that specifies how your app should look and behave when installed on a user’s device.
- Implement service workers to enable offline functionality and caching.
- Test your PWA with tools like Lighthouse to ensure compliance with PWA standards.
How can I create a web app from scratch using Fliplet?
Even if you wish to design a web app from the ground up, Fliplet has you covered. Fliplet provides a blank template option, which allows you to start with a clean slate. Alternatively, you can also choose from their pre-built templates if you have a specific design or functionality in mind. Once you’ve chosen the blank template or a pre-built one, you can customize and add the features you want. The process is user-friendly, and the best part is that you can develop your web app on Fliplet for free, making it a great choice for both beginners and seasoned developers alike.

